Easy Wire Heart Necklace and Earrings
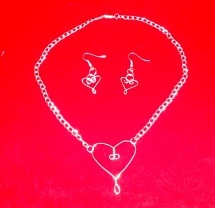
Running out of time and need the perfect piece for your Valentine's Day outfit? These free wire jewelry making instructions for an Easy Wire Heart Necklace and Earrings are super easy and quick to put together and super cute when finished! You'll have just what you need to woo your date and it'll be handmade! The fabulous jewelry making tutorial is complete with an easy-to-follow video. Follow along and create your own homemade necklace, set of DIY earrings, and possibly even a bracelet.
Project TypeMake a Project
Bead TypeWire
Time to CompleteUnder an hour
Bead Technique UsedChainmail/Wirework
Bead Project TypeEarrings, Necklace

Materials:
- 20 gauge wire
- Wire cutter
- Round nose pliers
- 2 lengths of chain (length dependent on necklace length)
- 8 jump rings
- Clasp
- 2 ear wires
Instructions:
Wire Heart:
- For pendant – Cut approx. 8 inches of 20 gauge wire. Gently bend wire in half forming a small loop at middle.
- Twist wire to secure small loop at bottom.
- With ends together, grasp with round nose pliers. Now bend wires first around the one side of plier and then again around both ends of pliers forming loops.
- Remove the pliers and with fingers, gently continue bending/folding the wire, following the initial bends, to approximately half way the length of the heart. With the loops facing towards you, bend them towards the center, forming the heart shape.
- Use your hands/fingers to mold/form your desired heart shape. Note: The heart can be left as is, or can be connected with a small jump ring or the center loops can be crossed and twisted to connect.
- Earring hearts can be made with smaller pieces of wire.
- Cut 2 lengths of chain to the desired length of necklace.
- Attach a jump ring to one end of the chain and then attach one end of the closure.
- Close and secure the jump ring.
- Repeat to the other length of chain.
- Now, attach a jump ring to the other end of the chain and to one side of the heart. Close and secure the jump ring. Repeat on other side.
Earrings:
- Attach jump ring to heart at the points where the loops meet at the middle/top.
- Attach another jump ring to the first jump ring along with the ear wire.
- Close and secure jump ring. Repeat to second earring. Note: To achieve an “upside down” heart – attach jump ring to bottom loop (of heart) and attach to jump ring.
Note:
You can make a bracelet too! Same as necklace, with adjustments made to the length of chain. Additional bracelet option: Form one length of chain with closure to wrist. Attach jump ring to heart and to one link of chain to form a “charm” bracelet.
Read NextDangle in a Hoop Beaded Earrings
Your Recently Viewed Projects
mulberrygalprinces s
Apr 24, 2017
Very cute, easy and inexpensive idea. And hearts can be in fashion at any time of the year. If you want to dress it up a bit, try hanging a crystal bead from the bottom of the heart. It only takes a jump ring. Or add a few small colorful beads at the end of the chain be gore attaching it to the wire. Just use a head pin with a loop on one end and make a loop on the other end, after threading on your beads of course.
Weberme
Jun 30, 2016
What a great tutorial and video to show how to make this super cute heart that can be used on this necklace and earrings and I bet even a pretty bracelet. It shows the whole process from start to finish. I can see this on a cute necklace and bracelet for a little girls birthday with maybe a small bead hanging from the end. I am going to give it a try.
deborahwade54 7536 751
Feb 01, 2014
But the tutorial was very helpful. I plan to use this technique in the near future. I must say that she didn't quite finish the tutorial before she went in to the commercial part of the video.
Report Inappropriate Comment
Are you sure you would like to report this comment? It will be flagged for our moderators to take action.
Thank you for taking the time to improve the content on our site.


