Basic Brick Stitch Video Tutorial
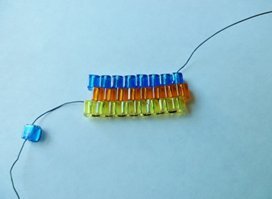
Beginner beaders rejoice! This brick stitch video tutorial will teach you everything you need to know about this basic beading technique. Follow these simple beading brick stitch instructions, and then try one of our free brick stitch jewelry patterns!
Project TypeLearn a Technique
Time to CompleteUnder an hour
Bead Technique UsedStitched

Materials:
- beading needle
- beading thread
- your choice of beads
Note: Must know the ladder stitch.
Instructions:
- Complete your foundation row of the ladder stitch to desired length.
- Pick up two beads. Place your needle in the space and under the thread between the first and second bead in the foundation row; tighten. This should stack the beads on top of the foundation row. Now thread up through the bead on the right; tighten. Thread down through the bead on the left and again, catch the thread between the first and second beads in the foundation row; tighten. To finish, thread up through the bead on the left and tighten.
- Pick up the next bead. Place your needle in the space and under the thread between the next set of beads in the foundation row; pull the thread through and tighten. Thread up through the bead and tighten.
- Repeat step 2 for the length of the row.
Note: To create the “flat” brick stitch, you start with the space between the first two beads under the row you are currently working on (as noted above). If you wish to create the “triangular” brick stitch, start with the space between the second and third beads under the row you are working on. This will decrease the beads and create the triangular shape.
"Flat" brick stitch:

"Triangular" brick stitch:

For more awesome stitching tutorials, check out our collection: Beginner Beading Tutorials: How to Peyote Stitch, Brick Stitch, Square Stitch and More!
Read NextCrystal Bangle Stacking Bracelets


