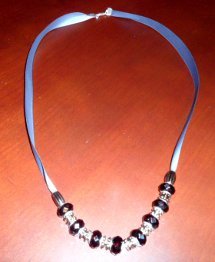
Sleek Hematite Heart Bracelet

Make a beaded bracelet to go with any and every ensemble with this Sleek Hematite Heart Bracelet project! This chic design uses gorgeous gemstone beads and pressed chain for a sleek and shiny look. It can easily go classy or casual for any occasion. Complete with a jewelry making video this DIY jewelry tutorial will help you make an elegant and chic DIY bracelet design. If you are looking for a homemade jewelry design that is subtle, but still has some sparkle, this is the beaded bracelet tutorial for you.
Project TypeMake a Project
Bead TypeGemstone
Time to CompleteIn an evening
Bead Technique UsedStrung
Bead Project TypeBracelet

Materials:
- crimping pliers
- wire cutters
- two pairs of chain nose pliers
- beading wire
- 6mm hematite beads
- snap clasp with jump ring on each side
- two crimp beads
- two wire guards
- two 7-inch lengths of chain
- two large jump rings
Instructions:
- Thread the wire through one crimp bead and one of the wire guards.
- Loop the wire around and thread it through the other side of the wire guard.
- Slide the crimp bead so that both the shorter wire and the main wire are going through the crimp bead, and leave a small amount of space between the wire guard and the crimp bead.
- With your chain nose pliers, slightly cinch the wire guard so that the parts of it where the wire pass through are now closer together.
- Leaving a small amount of space between the crimp bead and the wire guard, place your crimp bead on the back channel of your crimping pliers and crimp down.
- Turn your newly crimped bead so the smooth part is facing you and the dented part is facing away from you. Place the crimp bead in the front channel of the crimping pliers and crimp down.
- Thread on two of your hematite heart beads.
- Snip the excess second (shorter) wire at this point, being careful not to clip your main wire.
- Thread on the remaining beads.
- Repeat steps 1 through 7 for the other wire guard and crimp bead.
- Open up one of your large jump rings; thread on one end of the first chain link.
- Thread on the hematite strand you just created using the wire guard as the attachment.
- Thread on the second link of chain.
- Thread on one of the clasps, making sure that it is the attached jump ring being threaded onto the large jump ring.
- Close the jump ring and repeat for the other side.
- Enjoy your new bracelet!
Read NextPretty Pink Cube Bead Set
Your Recently Viewed Projects
Thanks for your comment. Don't forget to share!
Denver Silver
Feb 08, 2018
Regarding the 7 inch lengths of chain - did you use cup chain? If so, that is not specified in the directions. I enlarged the bracelet photo, looks like something different than just ordinary chain. Thank you.
Report Inappropriate Comment
Are you sure you would like to report this comment? It will be flagged for our moderators to take action.
Thank you for taking the time to improve the content on our site.