Black Pearl Treasure Necklace and Bracelet
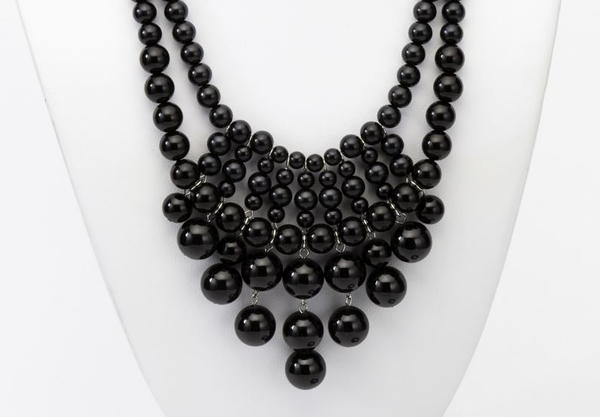
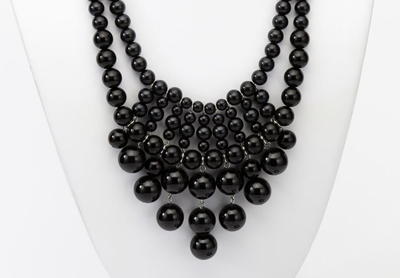
Try out this Black Pearl Treasure Necklace and Bracelet for a Mother's Day gift set or your own formal DIY jewelry combo. As far as DIY gifts go, this one will take the cake with elegant beads and formal design elements that make this DIY pearl necklace look more designer than DIY. The glassy beads lend an air of formality to this partial collar necklace and multi-size bracelets, and the dark color makes it particularly matriarchal and impressive. Get started on this black pearl DIY necklace and bracelet with this full tutorial!
Project TypeMake a Project
Bead TypePearl
Time to CompleteUnder an hour
Bead Technique UsedChainmail/Wirework
Bead Project TypeNecklace, Bracelet

Materials:
- 1 pk #34719059 145pc Starter Pack- Silver
- 1 pk #34722017 158pc 6mm Black Pearl
- 1 pk #7120503 27pc 14mm Glass Pearl Strand - Black
- 1 pk #3202102 40' .45mm 7-Strand Bead Wire - Silver
- 1 pk #7120303 41pc 10mm Round Pearl Strand - Black
- 1 pk #34722018 90pc 8mm Black Pearl
- #4501 Bead Crimping Pliers
- #6854 Needle Nose Pliers and Cutter- Precision Comfort
- #4477 Parrot Beak Memory Wire Cutter
- #6858 Round Nose Pliers - Precision Comfort
Bracelet #1 Instructions:
1. Cut a 12” length of beading wire. Using a crimp tube, attach one end of the wire to a lobster claw clasp.
2. Thread on the following: a 6mm pearl and a 14mm pearl. Repeat this pattern eight more times, then add one more 6mm pearl.
3. Connect three 6mm jump rings together to make a chain.
4. Use a crimp tube to attach the beading wire to the jump ring chain. Trim the excess wire.
Bracelet #2 Instructions:
1. Cut a 12” length of beading wire.
2. Using a crimp tube, attach one end of the wire to a lobster claw clasp.
3. Thread (5) 6mm pearls onto the wire.
4. Thread on the following pattern: a 4mm jump ring and a 6mm pearl. Repeat this pattern nineteen times. Then thread on (3) 6mm pearls.
5. Connect three 6mm jump rings together to make a chain.
6. Using a crimp tube, attach the beading wire to the jump ring chain. Trim the excess wire.
7. Make a single 6mm bead drop and attach to the end of the jump ring chain.
Necklace Instructions:
*Tip: When making bead links, the loops at the end need to be perpendicular to each other.*
1. Thread (2) 14mm pearls onto a head pin and form a loop.
2. Thread a 14mm pearl onto a head pin and form a loop. Repeat this step to make four single bead drops.
3. Thread a 14mm pearl and a 10mm pearl onto a head pin and form a loop. Repeat this step to make two double bead drops.
4. Thread a 10mm pearl onto head pin and form a loop. Repeat this step to make three single bead drops.
5. Thread (2) 8mm pearls onto an eye pin and form a loop. Repeat this step to make two double bead links.
6. Thread a 6mm pearl, an 8mm pearl, and a 6mm pearl onto an eye pin and form a loop. Repeat this step to make seven triple bead links.
7. Thread a 14mm pearl onto an eye pin and form a loop. Repeat this step to make three single bead links.
8. Connect the following, in order: an 8mm double bead link (from step 5), a 6mm jump ring, and a single 10mm bead drop (from step 4). Repeat this step to make two bead link strands.
9. Connect the following, in order: a triple bead link (from step 6), a 6mm jump ring, and a single 14mm bead drop (from step 2). Repeat this step to make a two bead link strands.
10. Connect the following, in order: a triple bead link (from step 6), a 6mm jump ring, and a double bead drop (from step 3). Repeat this step to make two bead link strands.
11. Connect the following, in order: a triple bead link (from step 6), a 6mm jump ring, a 14mm single bead link (from step 7), and a 14mm single bead drop (from step 2) Repeat this step to make two bead link strands.
12. Connect the following, in order: a triple bead link (from step 6), a 6mm jump ring, a 14mm single bead link (from step 7), and the 14mm double bead link drop (from step 1) to make a single bead link strand.
13. Cut a 22” length of beading wire.
14. Using a crimp tube, attach one end of the beading wire to a lobster claw clasp.
15. Thread on the following beads: (17) 6mm pearls, (12) 8mm pearls, the top loop of a bead link strand from step 8, an 8mm pearl, the top loop of a bead link strand from step 9, an 8mm pearl, the top loop of a bead link strand from step 10, a 6mm pearl, the top loop of a bead link strand from step 11, a 6mm pearl, the top loop of the bead link strand from step 12, a 6mm pearl, the top loop of the other bead link strand from step 11, a 6mm pearl, the top loop of the other bead link strand from step 10, an 8mm pearl, the top loop of the bead link strand from step 9, an 8mm pearl, the top loop of the other bead link strand from step 8, (12) 8mm pearls, and (17) 6mm pearls.
16. Using a crimp tube, attach the beading wire to a 6mm jump ring and trim the excess wire.
17. Cut a 26” length of beading wire.
18. Using a crimp tube, attach the beading wire to the lobster claw clasp.
19. Thread on the following beads: (22) 6mm pearls, (4) 8mm pearls, (5)10mm pearls, the jump ring from the first bead link strand added in step 15, a 10mm pearl, the jump ring from the second bead link strand added in step 15, a 10mm pearl, the jump ring of the third bead link strand added in step 15, a 10mm pearl, the jump ring of the fourth bead link strand added in step 15, a 10mm pearl, the jump ring of the fifth bead link strand added in step 15, a 10mm pearl, the jump ring of the sixth bead link strand added in step 15, a 10mm pearl, the jump ring from the seventh bead link strand added in step 15, a 10mm pearl, the jump ring from the eighth bead link strand added in step 15, a 10mm pearl, the jump ring of the ninth jump ring strand added in step 15, (5) 10mm pearls, (4) 8mm pearls, and (22) 6mm pearls.
20. Using a crimp tube, attach the beading wire to the 6mm jump ring from step 16. 21. Cut a 1 ¾” length of extender chain. Attach the chain to the 6mm jump ring from step 16. Attach the loop of a 10mm bead drop to the end of the extender chain.
Love this pearl jewelry project? Well, it along with 13 other gorgeous patterns are all featured with the FULL project instructions in this fantastic 14 Pretty Pearl Jewelry Patterns for Every Classy Occasion eBook. You will fall in love!
Your Recently Viewed Projects
mulberrygalprinces s
May 13, 2017
Very nice, very formal and classy. Against a silver or white top it would be just glorious. And after reading thru the instructions I don't find it difficult at all. It's something I would really like to have in my jewelry box. I don't need the bracelet , but I will make matching earrings. Thank you so much for sharing.
Report Inappropriate Comment
Are you sure you would like to report this comment? It will be flagged for our moderators to take action.
Thank you for taking the time to improve the content on our site.

