Rapunzel's Braid Necklace
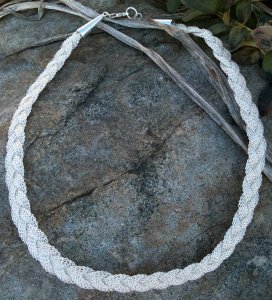
If anything can rival the silken strands of Rapunzel's hair, it's Rapunzel's Braid Necklace. Made using shimmering strands of SilverSilk knit wire, this do-it-yourself necklace is a simple yet elegant design fit to grace the collar of any fairy tale princess. You won't want to keep yourself locked up indoors (or away in a tower) when wearing this stunning necklace. Get ready to scale the castle walls and go out on the town to show off your handmade jewelry creation, because this DIY necklace deserves to be on display.
Project TypeMake a Project
Time to CompleteUnder an hour
Bead Project TypeNecklace

Materials:
- bench clamp or wire clamp
- ruler
- wire cutters
- chain nose pliers
- needle nose pliers
- three 20-inch strands 8 Needle 4.8mm wire
- 8 inches of 22 gauge wire
- two jewelry cones
- two open jump rings
- one closed jump ring
- one clasp
Instructions:
- Cut three pieces of SilverSilk's 4.7 Argentium or non-tarnish 4.8mm "8 Needle" flat knit to 20 inches per piece for a 16-inch finished piece necklace.
- Overlap the three strands of eight needle wire on one side and firmly attach a bench clamp to hold the strands together.

- Hold the closed clamp in your lap or clamp onto table or another sturdy surface so that both of your hands are free to braid the strands of knit.
- Wrap one strand of knit over the other to braid the wire.
- Take your time to carefully make sure that you are creating a very neat, very straight and even braid. Material should remain flat and not be lumpy.

- Braid to the end.
- Three strands of 20-inch knit will create a 16-inch completed necklace. Use longer strands of knitted wire to create a longer finished piece.
- Remove the clamp on one end only.
- Using one 4-inch piece of the 22 gauge wire, insert the wire directly through the three strands of knitted wire approximately 1/2-inch from ends.

- Hook both ends of the wire upward toward the end of your braided piece. One end may be longer than the other.
- Hold the ends of your braided piece between your index finger and thumb. Take the shorter end of the wire and wrap it around the knit (choking the ends of the knit, wrap the wire). If your wire is wrapping too loosely, press down on it with your needle nose pliers to tighten the wrap. Make sure to loop around a few times.


- Cut off the loose knit without going too close to where you wrapped as you don't want the wire-wrapped ends to slip off.
- Slide one cone over the longer end of your wire. Pull the cone tightly down over your wire-wrapped ends and onto your braided piece to hide your wire-wrapped ends.

- Using your needle nose pliers, wrap a loop at the end of your cone. After making your "p" loop, wrap the wire around the base of the neck.


- Repeat steps 8-14 above to attach the other cone on the opposite side.
- Using the open jump rings, attach the clasp to each end of your braided necklace.

If you love this DIY necklace, then be sure to subscribe to our Bling Buzz newsletter and have the latest and greatest DIY jewelry designs delivered right to your inbox!
Read NextJCrew Inspired Pearl Necklace
Your Recently Viewed Projects
EditorMC
Oct 07, 2016
I really love this DIY necklace! To make it extra rapunzel-like I could totally pin in some flowers in the braid! Super obsessed and easy!
Report Inappropriate Comment
Are you sure you would like to report this comment? It will be flagged for our moderators to take action.
Thank you for taking the time to improve the content on our site.

