Ribbon, Yarn, and Agate Slice Necklace
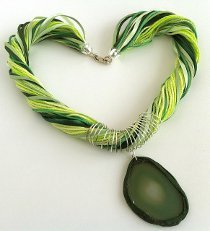
If you've always wanted to design your own gemstone jewelry, this Ribbon, Yarn, and Agate Slice Necklace is a great place to start gathering some inspiration. Donatella does it once again with this beautiful spring agate necklace. Make it in your favorite color!
Project TypeMake a Project
Bead TypeGemstone
Time to CompleteUnder an hour
Bead Technique UsedStrung
Bead Project TypeNecklace

Materials:
- One agate slice, in your chosen color
- Random ribbons, yarn, suede cords in same color scheme of the agate
- 18 gauge half hard sterling silver wire
- Chain - 2 soldered rings
- One lobster clasp
- Two end caps
- Pliers
- Scissors
- Glue gun
- Thread and needle
Instructions:
- Take a random bunch of all the ribbons, suede, yarn and folded in three parts (will be the length of your necklace).
- Tape it on your counter (or somewhere).

- Wrap it around tight while sewing it back and forth to make sure all the parts are secure and tight.

- Give it a nice clean cut.
- Wrap the base tight with some tape and cut the excess tape.

- Arm your gun and glue in place the end caps where you previously wrapped the clasp.
- Let it dry and clean the excess glue.
- To wrap the agate slice take a piece of suede (about 8" long for my agate) about three times the circumference of the stone.
- Place a small amount of glue (be sure that the glue will dry clear) on the side of the stone, and start wrapping the suede around.

- When the first round is complete, keep wrapping and glueing and when you want your stone to have the pendant ring, slide the rings inside the suede, and keep wrapping and glueing. I wrapped about 3 times, keeping the suede uneven, since the slices are not always the same thickness all around.

- Once is all wrapped, keep pushing the suede onto the agate until is nicely secured in place, and let dry very well.
- With a damp q-tip remove the messiness leftover from the tacky glue.
- Net a round stick, or a big marker, and coil the sterling silver wire around until you have about 1 1/2" on the stick, take it off the stick and with the round nose pliers create two tiny rings on both end of your "spring".

- Adjusting it with your hands, shape the coiled springy silver in a sort of a smile.

- Pass the chunky twisted ribbons and cord inside the spring and pass your agate slice through the spring until it's right in the middle of it.
- And you are good to go with another stunning piece handmade by you!
Read NextBlack Tie Beaded Necklace
mulberrygalprinces s
Jun 14, 2017
This is another pretty easy design by Donatella. Add inexpensive to that too. You can use any colors you want. It also gives you the chance to use up all those left over pieces of ribbon, yarn and cord. That's always a big plus for me. I need to go thru my scrap box and see what I can come up with. Then I will know what color pendant to get. Thank you for sharing.
Report Inappropriate Comment
Are you sure you would like to report this comment? It will be flagged for our moderators to take action.
Thank you for taking the time to improve the content on our site.

