Tila Garden Bracelet Pattern
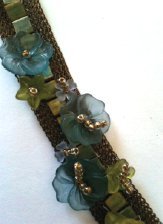
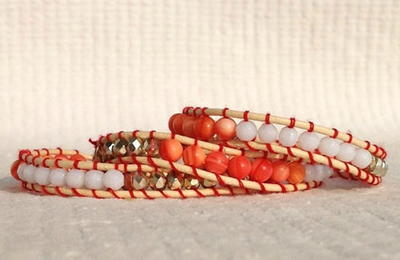
Sew a bed of Tila beads between two strands of SilverSilk with this beautiful Tila Garden Bracelet Pattern. If you're looking for beading designs and patterns that use Tila beads in a different way, this beaded bracelet pattern is sure to give you some stunning inspiration. Whether you choose to embellish your SilverSilk with Lucite flowers and seed beads or you keep it on the simpler side, this blooming bracelet will brighten up your look.
Project TypeMake a Project
Bead TypeSeed, Miscellaneous
Time to CompleteIn an evening
Bead Technique UsedStitched
Bead Project TypeBracelet

Materials:
- 16-18 inches of SilverSilk 8 Needle Flat, 4.8mm
- 32-35 Tila beads
- variety of Lucite flowers
- size 11 seed beads
- 8 feet of 6 lb. Fireline
- size 12 needle(s)
- clear nail polish (or beading glue)
- scissors or wire cutters
- beading mat
- clasp (your choice)
- four 6mm closed jump rings
- eight 4mm ID open jump rings
Instructions:
-
Prepare and measure your SilverSilk knit wire. Using your wire cutters or scissors, cut two pieces of SilverSilk’s 4.8mm, 8 needle flat knitted wire. Each piece should be 8 ½ inches long. (You may need yours slightly longer or shorter depending on your desired finished bracelet length.)

*Measurement: What size bracelet do you need? How long should your knitted wire be? Leave 1 inch on either end from where you
start and finish sewing your Tila beads, giving yourself room to attach a clasp. Keep in mind that your clasp will take approximately ¾ inches of space. For example, if I want my finished bracelet to be 7¼ inches and my clasp will be ¾ inches, my knitted bracelet will need to be 6½ inches. I will then need 1 inch on each end, making my required knit length 8½ inches.
-
Thread needle and attach Fireline. Sewing the Tila beads in between your two strands of knit will take approximately 36 inches of Fireline (6 lb. fishing line or Dandyline works too). To give yourself room for error, thread 44 inches of thread into your beading needle. Lay your two strands of 8 needle 4.8mm flat knitted wire parallel to one another on your bead mat. Measuring 1 inch down from the end, insert your threaded needle into the outside edge of the knit wire. After going through your first stitched loop, go around the knit and circle into the same stitch a second time, making a loop knot. Pull tight and put a little dab of nail polish (or beader's glue) onto your knot. Let it dry.
-
Sew the Tila beads into the SilverSilk knit. First, stitch each of the Tila beads between the two SilverSilk strands. Later in this
pattern, you will have the option to go back and embellish with Lucite flowers and seed beads. You will be sewing the Tila beads in and out of the stitched loops along the edge of the knit wire. The Tila beads will be your center row, connecting the two strands of SilverSilk 8 needle flat 4.8mm knit wire.

Each of the Tila beads has two holes. With your threaded needle, string through the top hole and across into the second strand of SilverSilk, connecting the two pieces of knitted wire. Go back through your Tila bead a second time and catch the side of the knit again, sewing back into the knit wire. Then bringing the Fireline down the outer edge of the knit, along the edge of the knit, dive back into the stitch beside the second hole of the Tila, sewing into the knit and then going back into the second hole
of the Tila.
*TIP: Make sure to continuously flip your piece over each time you make a stitch. The trick to keeping it flat, rather than having your Tila beads stack up, is to keep flipping your piece from one side to the next, turning it over each time you make a stitch. I go into one hole of the Tila from one side, then flip the piece over and go into the same hole of the Tila bead a second time. When doing this, the Fireline will run through the Tila bead twice per hole. Always stitch along the outside edge of the stitched knit. Keep the Fireline away from the inside as you do not want to see the stitches.

-
Adding rows of the Tila Beads. When adding another Tila bead, it is important that you hold the bead that you are adding directly below the previous one stitched. Line your next bead up perfectly in between your knit and hold it between your thumb and index finger to keep it in place as you stitch each bead in place. Continue with Step 4, adding one Tila bead below the last and stitching along the sides to sew all of your Tila beads in between your two pieces of SilverSilk’s 8 needle flat, 4.8mm knitted wire.
-
End Fireline. To complete adding your Tilas, finish by going through your last bead twice and make a double overhand knot. For extra security, add a dab of clear nail polish or glue over your knot and trim clean. (If you want to embellish your bracelet with seed beads, continue with Step 6; otherwise, continue on to Step 7 to add your end caps and clasp.)
-
Embellishment! Thread your beading needle with another 44 inches of Fireline (6 lb. fishing line or Dandyline). Using your threaded needle, start at one end on one side of your bracelet and sew in and out of the stitches (loops) of your
SilverSilk 8 needle flat, wherever you want to add a seed bead or Lucite flower. You can double them up if you’d like. Rather than going through the sides of the knit like you did when adding the Tilas, you will be working down each strand of the 8 needle
flat to add the Lucite flowers and seed beads along the top. There is not a right or wrong here. There is not an exact layout as to where to add your flowers.

-
Adding the Clasp. Using closed jump rings, sew one at a time into the four ends of your 8 needle flat knit. Fold the end of the knit to the back of your bracelet, inserting the jump ring in the crease of your fold. Using your threaded needle, stitch in and out of your knit, adding seed beads to the front of your piece, if you would like the embellished look. If you prefer, to keep your bracelet simple, without any embellishment, you can always finish your ends using a fold over end connector, like the one pictured. Complete by adding open jump rings to either your end connectors of the closed jump rings that you have just sewed in. Attach your clasp with the open jump rings to complete your bracelet.


Read NextDragonfly Princess DIY Bracelet

