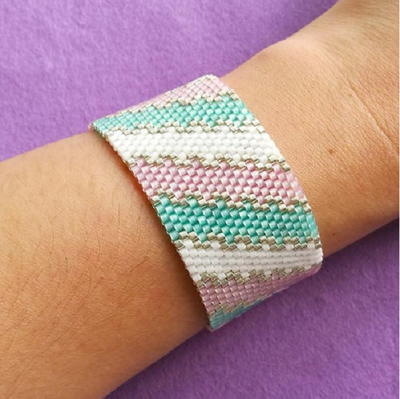
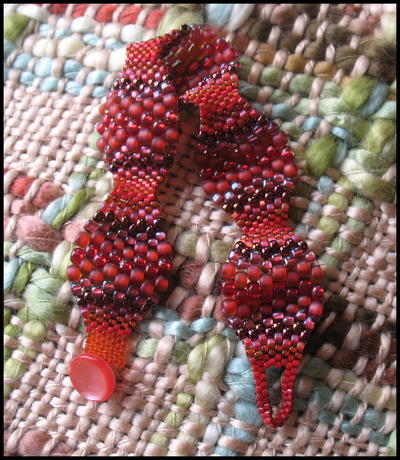
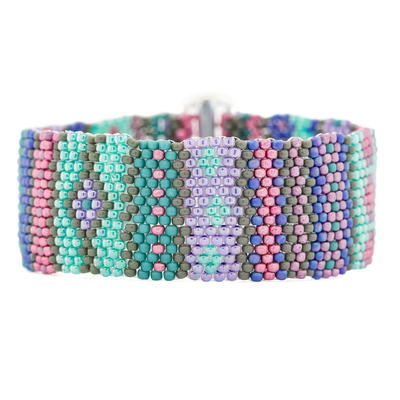
Intarsia Peyote Stitch Bracelet

Go beyond the usual with this Intarsia Peyote Stitch Bracelet. It's a great step-by-step tutorial to put your bead weaving skills to the test or to master the flat peyote stitch technique. With its gorgeous beaded design, this DIY bracelet has that complicated look and feel of its expensive store-bought sisters. However, you can say you created this piece of DIY jewelry all on your own! If you've never had the feel of a peyote stitch cuff on your wrist, this is an excellent seed bead pattern to try it out for the first time.
Project TypeMake a Project
Bead TypeSeed
Time to CompleteWeekend project
Bead Technique UsedStitched
Bead Project TypeBracelet

Materials List
- 1.5 grams - Size 11 Semi-Glazed Opaque Turquoise Round Japanese Seed Beads by Toho - 2604F (SB7186)
- 2 grams - Size 11 Semi-Glazed Opaque Soft Blue AB Round Japanese Seed Beads by Toho - 2636F (SB7200)
- 4 grams - Size 11 Opaque Seattle Gray Round Japanese Seed Beads (SB1929)
- 2 grams - Size 11 Matte Pink Lilac Permanent Galvanized Round Japanese Seed Beads by Toho - PF553F (SB5932)
- 2.5 grams - Size 11 Ceylon Light Sea Green Round Japanese Seed Beads by Toho – 920 (SB5900)
- 2 grams - Size 11 Ceylon Gladiola Round Japanese Seed Beads by Toho - 922 (SB5902)
- 1 gram - Size 11 Galvanized Matte Lavender Round Japanese Seed Beads by Toho - 554F (SB5852)
- 1 - 4x30mm Sterling Silver Tube Bar Clasp with Bar (SS4113)
- 1 - Crystal Clear FireLine Braided Bead Thread .008 diameter - 6 lb/Size D (SM4429)
- Size 12 Tulip Beading Needles (TL2837)
- Xuron Thread and Fiber Scissors (TL3000)
- Perfect End Thread Burner (TL1006)
Instructions
-
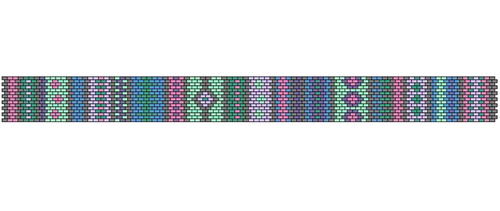
Thread a needle with 5 feet of beading thread (add new thread as needed). Use flat peyote stitch to weave the pattern shown (download PDF for enlarged chart).
-
When the bracelet reaches the desired length, loop one end of the flat peyote piece through the bar on one side of the tube bar clasp. Weave the thread in and out between beads on the end row and beads in the base of the bracelet. Weave back down through a few rows, and use a Perfect End Thread Burner to burn the end of the thread.
-
Repeat Step 2 on the other end of the bracelet.
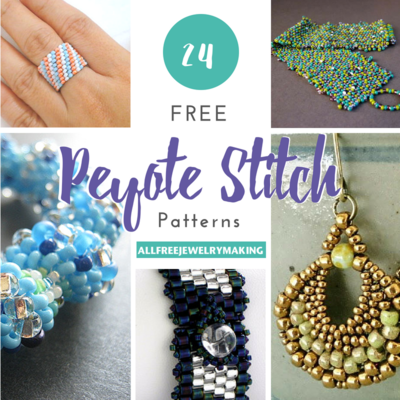
Read Next24 Free Peyote Stitch Patterns
Thanks for your comment. Don't forget to share!
mulberrygalprinces s
Aug 15, 2017
This is a very pretty cuff. And what the previous poster said is true. In a project like this it's best to use a quality brand seed bead. Like Toho. I have had a problem with the cheaper glass ones. Not only are the sizes not the same but the colors tend to be different too.
bjanddon1995 52301 41
Apr 14, 2017
somehow I couldn't get a large copy of the bracelet pattern. I probably did something wrong.
LynM
Dec 03, 2016
I would suggest that only the more experienced beaders try this one. And I would also suggest that you use the beads specified and dont try to substitute cheaper alternatives. When working a Peyote Cuff, its most important that the beads fit well together. Many of the budget bead options can be slightly odd-shaped, and even a little different in size.
Laura P
Jul 08, 2016
This is cool. I like the choice of bright hued beads. Most stitched projects are crystals or darker hues. This is a fresh idea!
Report Inappropriate Comment
Are you sure you would like to report this comment? It will be flagged for our moderators to take action.
Thank you for taking the time to improve the content on our site.