Precious Pumpkin Beads
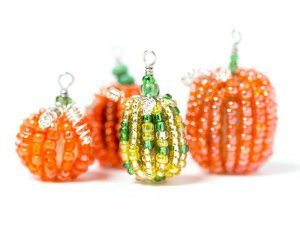
Everyone loves carving pumpkins for Halloween, but what about beading pumpkins? Bring your favorite fall motif into your beadwork with this pattern for Precious Pumpkin Beads. Halloween craft ideas for beaders can be hard to come by, which makes these little seed bead squashes extra special. Turn a pair of pumpkins into earrings, or make a set of seed bead pumpkins to hang off a festive charm bracelet. There are plenty of possibilities with this beading pattern! Get into the fall spirit and craft these incredibly precious pumpkin beads!
Project TypeMake a Project
Bead TypeSeed
Time to CompleteIn an evening
Bead Technique UsedStitched
Bead Project TypeOther

Materials:
- #34733062- 40g Green Silver-lined 11/0 Seed Beads
- #34733040- 40g Yellow 11/0 Seed Beads
- #34733061- 40g Green 6/0 E-Bead Mix
- #34733041- 40g Gold Silver-lined 11/0 Seed Beads
- #34720007- 90G Orange Seed Bead Mix
- #34719031- 180pc Head Pin Silver
- #3201802- 40' 24 Gauge Wire- Silver
- #32024- 360' #8 Monofilament- Clear
- Pumpkin Beads Project Sheet
- #34733002 105g Wood Mix
- Round Nose Pliers #4458
- Wire Cutters #4457
Bead Instructions:
- Depending on the size of the bead, cut a length of monofilment cord from 24 inches to 36 inches.
- Thread the cord through a wood bead, leaving a 1-inch tail. Then bring the cord back down through the bead.
- Bring the cord through the loop at the side of the bead from back to front. Cross the cord over itself and through the loop just created. Pull the cord snug against the bead and tighten. This creates a knot. Use a dot of glue to secure the knot. Trim the tail end.
- Bring the long end of the cord (coming down out of the bead) up against the wood bead. Add seed beads to the cord until you reach the hole. Bring the cord down through the hole and keep it snug. Repeat this step until the wood bead is covered in stripes of seed beads.
*The inspiration samples shown use a variety of seed bead colors. Try incorporating golds, clear, yellows, and greens to mimic the colors of a gourd.
- After the wood bead is covered in seed bead stripes, continue wrapping the cord around the wood bead a few more times to keep the cord secure. Then tie the cord into a knot at the bottom of the wood bead. Trim the excess cord. Use a dot of glue to secure the knot.
- Thread a head pin with an e-bead. Bring the head pin up through the wood bead. Thread the wire coil onto the head pin and thread on two e-beads. Form a wrapped loop.
*Use e-beads or seed beads to create the stem of the pumpkin bead.

Wire Coil Instructions:
- Cut an 8-inch length of wire.
- Fold the wire in half. Using the round nose pliers, fold the wire over itself. Keep wrapping the wire into a two- or three-loop coil. This coil section will slide onto the pumpkin bead head pin and sit below the green stem beads.
- Using the pliers, coil one end of the wire (starting at the end) and continuously coil until there’s approximately 1/4 inch to 1/2 inch of wire between the center coil (from step 2) and the coiled end.
- Repeat step 3 for the other end of the wire.
BONUS! For even more Halloween projects, be sure to check out our collection of 13 Haunting Halloween Craft Ideas for Jewelry and Accessories!
Read NextLovely Beaded Hearts Bracelet
Hippie Chick
Sep 19, 2018
The perfect time of the year to find this pattern and time to get busy making a few of these. I am a little puzzled about the Pumpkin Beads Project Sheet that is listed under the materials list. I dont see a link or any information in the instructions shown on this page as to where to find it.
mulberrygalprinces s
Jul 24, 2017
Very cute and very easy to make. I can think of so many uses for these. Make a bunch and put them on a Halloween banner. Hand them out at your party, make a Halloween mobile, plus the regular uses such as earrings, pendants, shoe tie decoration. Thank you for sharing these little guys.
Cheryl Y
Sep 02, 2016
I always wanted to know how these Precious Pumpkin Beads were made? Now with this free how to I know and can make my own. I want to make these for Halloween ear rings and a necklace. The pattern is well written and right here on this page.. I like the pictures to show just how to string with the wood bead. Thanks it does help. I'm looking forward to doing this one. Thank you for this free how to pattern.
sarlachavda 232378 1
Oct 28, 2013
Thought the little pumpkin very amazing I hope mine will look something like them. I am avery new beginner at beading so please forgive me.
Report Inappropriate Comment
Are you sure you would like to report this comment? It will be flagged for our moderators to take action.
Thank you for taking the time to improve the content on our site.

