Sugar Pop Necklace
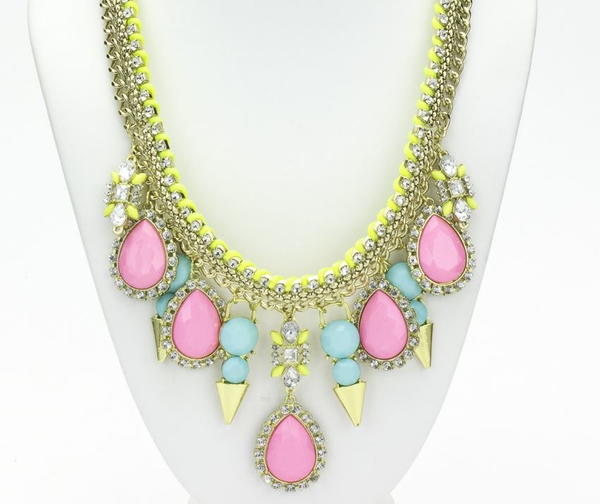
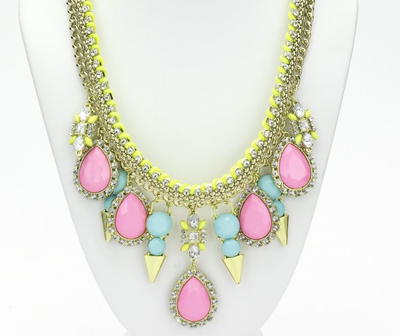
This Sugar Pop Necklace is the sweetest DIY jewelry project. The teardrop jewels and satin cording make this decorative DIY collar necklace a thing of royal beauty. The bright colors and shining stones combine with a gold chain to form a truly delicious palette of style. (The color scheme works especially well for Easter wear!) Check out this full tutorial to learn how to make a necklace that incorporates neon colors, rhinestone accents, and a regal collar design for a lip-smacking good DIY statement necklace.
Project TypeMake a Project
Bead TypeMiscellaneous
Time to CompleteUnder an hour
Bead Technique UsedChainmail/Wirework
Bead Project TypeNecklace

Materials:
- 1 pk #34712001 145pc Starter Pack - Gold
- 3 pk #30214528 2pc Acrylic and Metal Neon Pink and Gold Accents
- 1 pk #30214543 3pc Acrylic and Metal Neon Yellow and Clear Crystal Rhinestone Connectors
- 3 pk #30214512 7in Metal Gold Chain Strand with Rhinestones
- 1 pk #30214580 Neon Yellow Satin Cord, 24ft/7.3m
- 2 pk #30214558 Neon Blue and Gold Acrylic Dagger Accents, 2pc
- #22279002 3.7oz E6000 Craft Glue
- #6854 Needle Nose Pliers and Cutter Precision Comfort
Instructions:
1. Line the three lengths of chain side by side, with the rhinestone sections on the top side. Remove the lobster claws from the second and third lengths of chain.
2. Cut two ¼” pieces off a head pin. Dip both ends of each piece into glue. Slide both ends of each piece into the side slots of the rhinestone connectors, on each side, where the rhinestone sections of chain meet. Push the chains so they come together and allow them to dry thoroughly.
3. Use the jump rings to connect the curb section of the three lengths of chain together. Connect the last jump ring to the lobster claw clasp on the other end of the connected chains.
4. Cut a 60” length of yellow satin cord. Wrap it around the rhinestone edges, and through the spaces between the holes, of the entire length of chain. Cut both ends of cord leaving a short tail on each end to tuck back under the bottom of the last couple of wraps on each end of the chain. Secure with a dab of glue and allow to dry. Reinforce the head pin connections by placing a dab of glue on the under-side of the yellow cords where the three lengths of chain join/connect together. Allow to dry. *Tip: Melt the ends of the satin cord to make it easier to thread through the spaces.*
5. Use a 4mm jump ring to connect a pink rhinestone drop and a yellow rhinestone connector to make a double rhinestone drop. Use two 6mm jump rings to connect the other end of the yellow rhinestone connector to the two bottom links of chain in the middle of the necklace.
6. Use two 6mm jump rings to connect a turquoise drop to the 1st and 3rd chain links on each side of the double rhinestone drop in the middle of the necklace.
7. Use 6mm jump rings to connect a pink rhinestone drop to the 3rd chain link on each side of the turquoise drops added in the previous step.
8. Use 6mm jump rings to connect a turquoise drop to the same chain link the drop was connected to in the previous step, and to the 2nd chain link over, on each side of the necklace.
9. Use 6mm jump rings to connect a pink rhinestone drop to the 3rd chain link on each side of the turquoise drop added in the previous step.
10. Use 6mm jump rings to connect one end of a yellow connector to the 3rd chain link on each side of the pink rhinestone drop added in the previous step.
Read Next$3 Charm Necklace
Hippie Chick
Jan 17, 2018
I dont know how anybody else feels, but I like to see more pictures with a tutorial. Just seeing a picture of the finished item is not enough for me. I have questions. I need to see how it should look at each step during the process to know that I am still on track instead of waiting til the end of hoping.
margiekins22
Nov 01, 2016
Love the colors in this necklace! It is super super pretty and looks so chic!
Report Inappropriate Comment
Are you sure you would like to report this comment? It will be flagged for our moderators to take action.
Thank you for taking the time to improve the content on our site.

