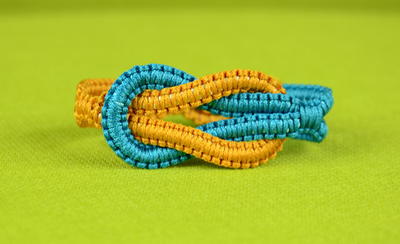
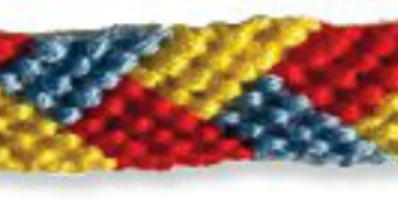
Basket Weave Friendship Bracelet Pattern
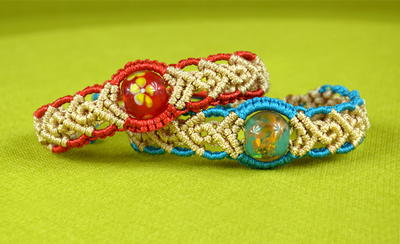
The intertwined pattern of this Basket Weave Friendship Bracelet perfectly portrays the bond of friendship (and looks pretty cool too)! One of our favorite friendship bracelet designs, the basket weave bracelet would make a great gift for your best pal.
Project TypeMake a Project
Time to CompleteIn an evening
Bead Project TypeBracelet

Notes:
- Before you begin making your friendship bracelet, you should know how to make a Right Hand Double Knot and Left Hand Double Knot. You can see these instructions at choosefriendship.com.
- These instructions teach you how to complete the pattern using My Friendship Bracelet Maker. However, the pattern can be completed without the loom as well.
Instructions:
- Pick three different colors. (The example uses yellow, red and light blue.) You will need two strands of yellow, two strands of red, and two strand of light blue.
- Align string, fold in half, and tie knot 1/2 inch from fold, forming a loop.
- Attach your 1/2-inch loop to MYFBM under the butterfly clip.
- Separate strings by placing one string per slot. Note: Use the same color in slots 1, 3, and 5 (red); slots 2, 4, and 6 (yellow); and slots 7, 8, and 9 (light blue). This will align the colors of your bracelet pattern. (There will be an extra red, yellow, and light blue string; simply cut at the knot.)
- To begin, take string #5 (red) and make a right hand double knot with string #6 (yellow). String #5 will now be in slot 6.
- Take string #3 (red) and make two right hand double knots, one each on string #4 (yellow) and string #5 (yellow). String #3 (red) will now be in slot 5.
- Take string #1 (red) and make three right hand double knots, one each on string #2 (yellow), string #3 (yellow), and string #4 (yellow). String #1 (red) will now be in slot 4.
- Take string #8 (light blue) and make four left hand double knots, one each on string #7 (light blue), string #6 (red), string #5 (red), and string #4 (red). String #8 (light blue) will now be in slot 4.
- Take string #9 (light blue) and make four left hand double knots, one each on string #8 (light blue), string #7 (red), string #6 (red), and string #5 (red). String #9 will now be in slot 5.
- Take string #9 (light blue) and make three left hand double knots, one each on string #8 (red), string #7 (red), and string #6 (red). String #9 (light blue) will now be in slot 6.
- Take string #1 (yellow) and make five right hand double knots, one each on string #2 (yellow), string #3 (yellow), string #4 (light blue), string #5 (light blue), and string #6 (light blue). String #1 (yellow) will now be in slot 6.
- Take string #1 (yellow) and make four right hand double knots, one each on string #2 (yellow), string #3 (light blue), string #4 (light blue), and string #5 (light blue). String #1 will now be in slot 5.
- Take string #1 (yellow) and make three right hand double knots, one each on string #2 (light blue), string #3 (light blue), and string #4 (light blue). String #1 (yellow) will now be in slot 4.
- Take string #9 (red) and make five left hand double knots, one each on string #8 (red), string #7 (red), string #6 (yellow), string #5 (yellow), and string #4 (yellow). String #9 (red) will now be in slot 4.
- Take string #9 (red) and make four left hand double knots, one each on string #8 (red), string #7 (yellow), string #6 (yellow), and string #5 (yellow). String #9 (red) will now be in slot 5.
- Take string #9 (red) and make three left hand double knots, one each on string #8 (yellow), string #7 (yellow), and string #6 (yellow). String #9 (red) will now be in slot 6.
- Take string #1 (light blue) and make five right hand double knots, one each on string #2 (light blue), string #3 (light blue), string #4 (red), string #5 (red), and string #6 (red). String #1 (light blue) will now be in slot 6.
- Take string #1 (light blue) and make four right hand double knots, one each on string #2 (light blue), string #3 (red), string #4 (red), and string #5 (red). String #1 (light blue) will now be in slot 5.
- Take string #1 (light blue) and make three right hand double knots, one each on string #2 (red), string #3 (red), and string #4 (red). String #1 (light blue) will now be in slot 4.
- Take string #9 (yellow) and make five left hand double knots, one each on string #8 (yellow), string #7 (yellow), string #6 (light blue), string #5 (light blue), and string #4 (light blue). String #9 (yellow) will now be in slot 4.
- Take string #9 (yellow) and make four left hand double knots, one each on string #8 (yellow), string #7 (light blue), string #6 (light blue), and string #5 (light blue). String #9 (yellow) will now be in slot 5.
- Take string #9 (yellow) and make three left hand double knots, one each on string #8 (light blue), string #7 (light blue), and string #6 (light blue). String #9 (yellow) will now be in slot 6.
- Take string #1 (red) and make four right hand double knots, one each on string #2 (red), string #3 (red), string #4 (yellow), and string #5 (yellow). String #1 (red) will now be in slot 5.
- Take string #1 (red) and make two right hand double knots, one each on string #2 (red) and string #3 (yellow). String #1 (red) will now be in slot 3.
- Take string #9 (light blue) and make a left hand double knot with string #8 (light blue). String #9 (light blue) will now be in slot 8.
- At this point you have completed one rotation of the pattern. Repeat steps 5-25 to continue the pattern until your bracelet is long enough to fit your wrist.
- Once your bracelet is long enough to fit your wrist, take three strings from slots 1-3 in your left hand and three string from slots 7-9 in your right hand and braid with the remaining three center strings.
- Take the braided strings and tie two basic knots at the end of your friendship bracelet. (Learn how to finish your friendship bracelet with knots or beads by visiting choosefriendship.com)
- Unclip your friendship bracelet from the butterfly clip and cut off the excess braided section. Your bracelet is ready to wear or share!
Read NextBeginner's Wrap Bracelet
Your Recently Viewed Projects
Thanks for your comment. Don't forget to share!
lilliandro 0268673
Jul 22, 2013
I really wish they would teach you how to do it without the maker. I strongly believe in making it the natural way, without a machine.
editorKS
Jul 25, 2013
Hi, lilliandro 0268673! The friendship bracelet pattern can be made with or without My Friendship Bracelet Maker. The instructions are the same either way. The My Friendship Bracelet Maker Loom does not make the bracelet for you; rather, it's just a way of holding the floss and keeping the strings organized to keep things from getting tangled. You should be able to follow this pattern without having the loom if you like! Hope this helps! :) --Editors of AllFreeJewelryMaking
Report Inappropriate Comment
Are you sure you would like to report this comment? It will be flagged for our moderators to take action.
Thank you for taking the time to improve the content on our site.