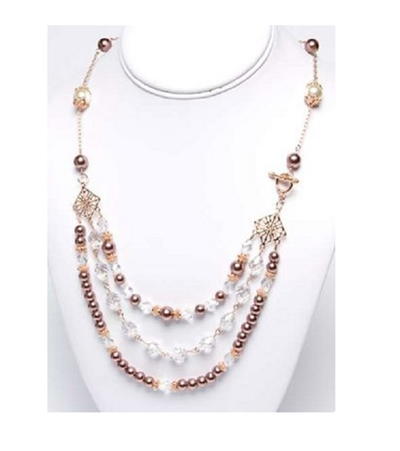
Bring vintage glamor to the modern world with this Rose Gold Romance Necklace pattern. This breathtaking DIY necklace design would look equally appropriate adorning the neckline of a gentlewoman in a 19th-century drawing room or gracing the collar of a modern-day starlet strolling the red carpet. The use of rose gold findings and filigree accents gives this piece an extra feminine touch, while the mix of pearls and faceted beads add equal parts sparkle and shine. Beading designs and patterns with such soft elegance are a rare gem, and this necklace pattern is certainly one to be treasured.
Project TypeMake a Project
Bead TypeCrystal, Pearl
Time to CompleteIn an evening
Bead Technique UsedStrung
Bead Project TypeNecklace

Materials List
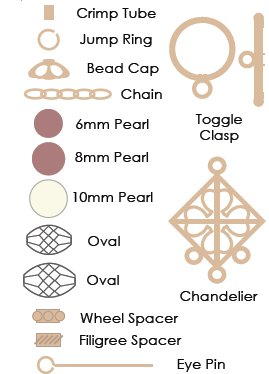
- (2) #7723501- 6pc 11X8mm Crystazzi Oval- Crystal
- (2) #7723101- 7pc 9X6mm Crystazzi Oval- Crystal
- #3949419- 1pc 18" Link Chain- Rose Gold Plate
- #71369072- 25pc 35mm Eye Pin- Rose Gold Plate
- #71369036- 10pc 9mm Filigree Bead Cap- Rose Gold Plate
- #71369044- 10pc 8x3.5mm Antique Wheel Spacer- Rose Gold Plate
- #71369038- 10pc 6x4.5mm Squish Filigree- Rose Gold Plate
- #3949466- 1 Set 10mm Band Accent Toggle- Rose Gold Plate
- #71369065- 4pc 25x29mm Filigree Chandelier- Rose Gold Plate
- #3949425- 38pc 2x3mm Rose Gold Crimp Bead
- #3949448- 16pc 6mm Open Jump Ring- Rose Gold Plate
- #7120218- 50pc 8mm Round Pearl Strand- Chocolate
- #7120118- 68pc 6mm Round Pearl Strand- Chocolate
- #34722102- 58pc 10mm Round Pearl White
- #3202002- 40' .3mm 7-Strand Bead Wire- Silver
- #4458 Round Nose Pliers
- #4501 Crimping Pliers
- #4457 Wire Cutters
Are you a beading fan? New to beading? No matter what your skill level, there is something for everyone in this beading guide. The more you know about your jewelry making supplies the better you will be able to work with them for your many different projects.Basic Bead Guide for DIY Jewelry Beading Patterns
Instructions
-
Cut six 1-inch and one 2-1/2-inch lengths of chain.
-
Make the four 8mm pearl links and the four bead caps/10mm pearl links. Thread the bead(s) onto an eye pin and form a loop.
-
Link the chain and beaded links together as shown in the illustration. Attach one end of the chain/links to a chandelier using a jump ring. Attach the other end of the chain/links to the bar end of the toggle using a jump ring. Connect the round toggle end to a chandelier using a jump ring.
-
Cut a 7-inch and an 11-inch length of beading wire.
-
Use a crimp tube to attach the 7-inch wire to the inside loop of a chandelier. Thread the bead pattern onto the wire (use the smaller ovals). Use a crimp tube to attach the wire to the inside loop of the other chandelier.
-
Make the 10 oval beaded links (use the larger ovals). Link them together and attach the ends to the center links of the chandeliers.
-
Use a crimp tube to attach the 11-inch wire to the outside loop of a chandelier. Thread the bead pattern onto the wire (use the smaller ovals). Use a crimp tube to attach the beading wire to the outside loop of the other chandelier.


