Parisian Charm Bracelet
By: Nunn Design
Parisian Charm Bracelet
This Parisian Charm Bracelet tutorial will show you how to make a bracelet that is perfect for the glamorous jet setting gal. Learn how to make cool bracelets using resin with this free DIY jewelry project. Use this idea to commemorate a favorite trip you took or to create a stunning collage of places you'd like to visit. The possibilities are endless with resin jewelry! The gorgeous Nunn Design bezels give this piece a professional finishing touch.
Project TypeMake a Project
Time to CompleteWeekend project
Bead Project TypeBracelet
Materials:
- 1 small Gel du Soleil 5/16oz
- 2 Ornate Mini Rectangle-Slv (ompr-sb)
- 1 Ornate Mini Square-Slv (omps-sb)
- 1 Ornate Large Circle-Slv (olpcs-sb)
- 1 Small Pendant Circle-Slv (spc-sb)
- 1 Mini Link Circle-Slv (mlcs-sb)
- 1 Round toggle – Slv (rt-sb)
- 1 Twig Toggle Bar – Slv (ttb-sb)
- 12 Oval jump rings-Slv
- 1 Small Heart – Slv (shso-b)
- 1 Key Charm- Slv (kcs-b)
- 1 Elongated Heart – Slv (ehcs-b)
- 1 Collage Sheet Paris (csp)
- 1 Nunn Design Glue
Instructions:
-
Select your image from the Paris Collage Sheet. Trim the image to fit the bezel of choice. (Leave the Small Link Circle – Antique Silver empty.)


-
Using the Nunn Design Glue, paint a thin coat into the base of the bezel. Place your collage image from Step 1 into the base of the bezel on the wet glue. Starting in the center, burnish the image down with a cotton swab, pressing any excess glue out to the edges.


-
Paint a thin coat of the Nunn Design Glue over the top of the collage image ensuring you cover all 90° angles. Let dry overnight (8 – 12 hours). Note: The dry time is critical to prevent bubbles from occurring due to the moisture in the collage image.

-
Using the Gel du Soleil, drop a few drops into the center of your fully dried collage image. Tip the bezel slightly allowing the Gel to flow to the sides. Continue to add additional amounts of Gel until you have filled the bezel to the desired height.


-
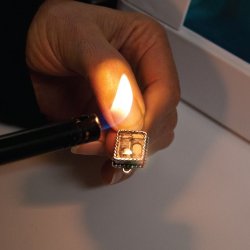
Use the headpin, matches, or a lighter to pop any bubbles that come to the surface. The headpin can be used directly on the bubble. To use the matches or lighter, hover the flame closely over the bubble in the resin – this will pull the bubble to the top and pop it. Be careful to keep the flame from actually touching the resin.

-
Let cure for 20 minutes under a glass dish on the windowsill in direct sunlight or under a UV lamp. It must have the full intensity of the sun (no clouds) to cure.

-
Using your cutters, cut the loop off of the end of the Mini Link Circle. Glue the piece into the center of the Small Link Circle using strong glue such as Bond 527 Cement or E6000.


-
Using the 9mm Oval Jump rings, start to assemble the pieces using two pairs of needle-nose pliers to open and close the jump rings. Attach each bezel with a jump ring to the bracelet.
